
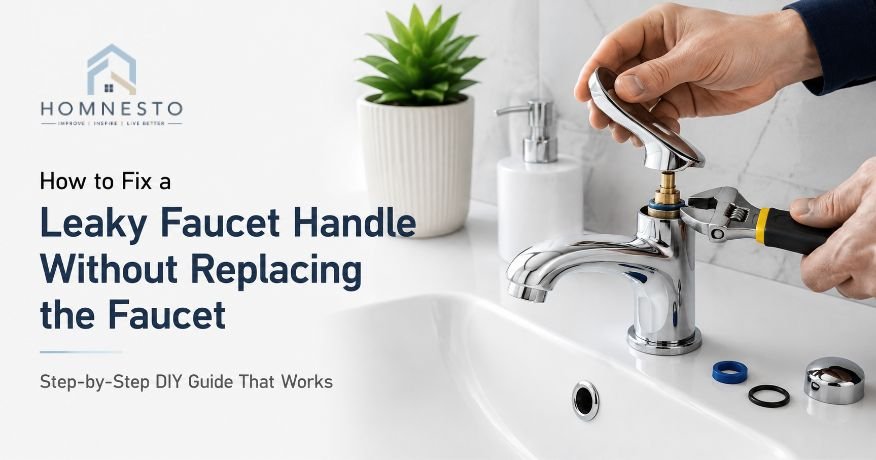

A faucet that won’t stop dripping is more than just annoying. Even a slow drip can waste gallons of water over time, increase your water bill, and leave stains around your sink. The good news is that learning how to fix a leaky faucet is easier than many homeowners think. In many cases, you don’t need to replace the entire fixture. A simple DIY repair can solve the problem in less than an hour.
Most faucet handle leaks happen because a small part inside the faucet wears out. A damaged cartridge, cracked O-ring, worn washer, or faulty stem can all allow water to escape around the handle or continue dripping from the spout. Whether you’re dealing with a single handle or double handle faucet, the repair process is usually straightforward if you know where to look.
This guide explains how to repair a leaky faucet step by step using simple tools and affordable replacement parts. You’ll learn how to fix kitchen and bathroom faucets, identify the real cause of the leak, avoid common mistakes, and know when a repair is enough, or when replacing the faucet makes more sense.
Why Is Your Faucet Handle Leaking?
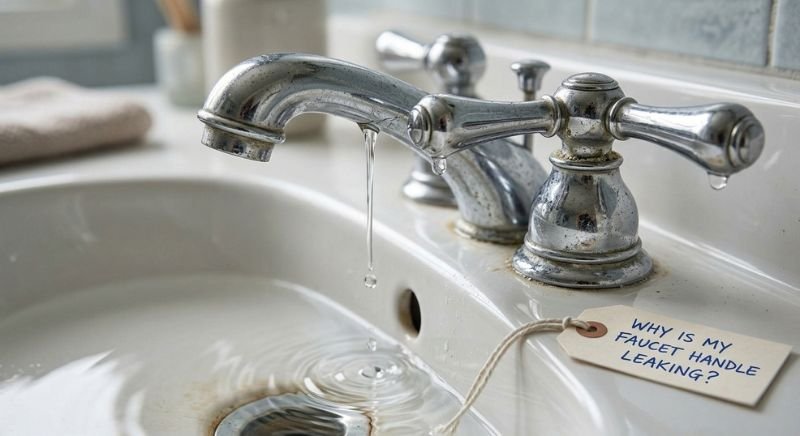
Before grabbing your tools, it’s important to understand why the leak started in the first place. A faucet handle rarely leaks without a reason. In most cases, one small part has simply reached the end of its lifespan.
Finding the real cause first makes the repair easier and prevents you from replacing parts that are still in good condition.
Common Causes of a Leaky Faucet Handle
If you’ve been asking, what causes a leaky faucet or why is my faucet leaking, one of these problems is usually responsible.
Worn-Out Cartridge
Modern faucets often use a faucet cartridge to control water flow. After years of daily use, the cartridge seals wear down, allowing water to leak around the handle or drip from the spout.
This is one of the most common reasons a faucet is leaking, especially in newer kitchen and bathroom faucets.
Damaged O-Ring
The O-ring is a small rubber seal that keeps water inside the faucet body. Over time, heat, pressure, and mineral buildup can make it brittle or cracked.
When this happens, you may notice water leaking directly from the handle instead of the spout.
Worn Faucet Washer
Older compression faucets rely on a rubber washer to stop water flow. As the washer wears down, it no longer creates a tight seal.
This often causes:
- Faucet dripping water
- A faucet that won’t stop dripping
- A steady drip even after turning the handle off completely
A simple washer replacement is often all that’s needed for a leaky faucet repair.
Damaged Faucet Stem
The faucet stem connects the handle to the valve inside the faucet. If it becomes worn, cracked, or corroded, water can escape around the handle.
Replacing the stem is still much less expensive than installing a brand-new faucet.
Corroded Valve Seat
The valve seat connects the faucet to the spout. Hard water minerals can slowly corrode this area, creating tiny gaps where water leaks through.
If ignored, the leak usually becomes worse over time.
Loose Parts
Sometimes the solution is surprisingly simple.
Daily use can slowly loosen:
- Packing nuts
- Handle screws
- Retaining clips
- Decorative caps
Even slightly loose hardware can cause a faucet leak at the handle.
Signs the Faucet Can Be Repaired Instead of Replaced
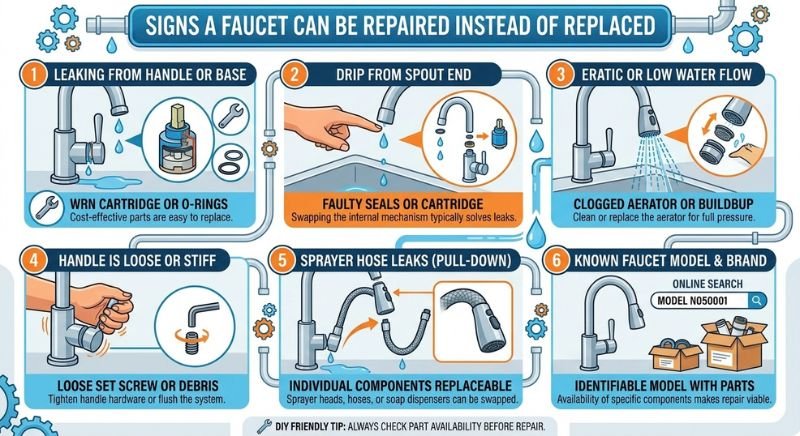
Many people assume they need a completely new faucet after noticing a leak. In reality, that’s rarely the case.
If you’re wondering, can you fix a leaky faucet yourself, the answer is yes for most common leaks.
Your faucet can usually be repaired if:
- The leak only started recently.
- Water pressure is still normal.
- The faucet body isn’t cracked.
- The handle still turns smoothly.
- The leak comes from the cartridge, washer, or O-ring.
- Rust is minor and only affects replaceable parts.
In these situations, repairing a leaky faucet is usually faster and far less expensive than replacing the entire fixture.
You may want to replace the faucet instead if the body is cracked, heavily corroded, or has multiple damaged internal components.
Before You Start: Tools and Parts You’ll Need
Getting everything ready before you begin will save time and make the repair much smoother.
Most DIY faucet repairs only require basic household tools plus a few inexpensive replacement parts.
Essential Tools for Faucet Handle Repair
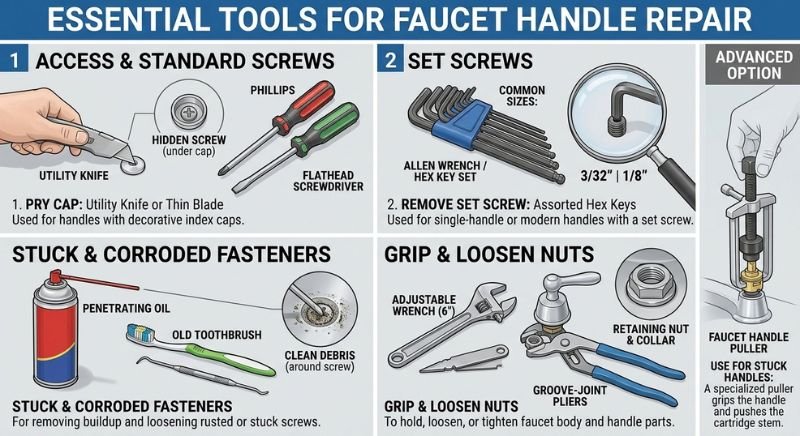
You probably already own most of these tools.
| Tool | Why You’ll Need It |
| Adjustable wrench | Loosens retaining nuts |
| Phillips screwdriver | Removes handle screws |
| Flathead screwdriver | Lifts decorative caps |
| Allen wrench set | Removes set screws on many faucet handles |
| Needle-nose pliers | Pulls clips and small parts |
| Soft cloth | Protects faucet finish from scratches |
| Small brush or toothbrush | Cleans mineral deposits |
| White vinegar | Helps remove hard water buildup |
| Plumber’s grease | Lubricates rubber seals during reassembly |
Keeping a towel in the sink is also a good idea. It prevents small screws or clips from disappearing down the drain.
Replacement Parts (Cartridge, O-Ring, Washer & Stem)
Every faucet design is different, so identify your faucet brand and model before buying replacement parts.
The most commonly replaced parts include:
Faucet Cartridge
The cartridge controls hot and cold water flow.
If your faucet keeps dripping after being turned off, replacing the faucet cartridge is often the best repair.
O-Ring
A worn O-ring is one of the most common reasons for water leaking from the faucet handle.
Since O-rings cost very little, many homeowners replace them whenever they take the faucet apart.
Faucet Washer
Compression faucets depend on rubber washers to seal water flow.
If you’re fixing an older faucet, a simple washer replacement may completely stop the leak.
Faucet Stem
If the cartridge and washer look fine but the faucet is still leaking, inspect the faucet stem for wear or corrosion.
Replacing the stem often restores proper sealing.
Valve Seat
The valve seat doesn’t always need replacement, but it should always be inspected.
If it’s rough, pitted, or covered with heavy mineral deposits, resurfacing or replacing it can prevent future leaks.
How to Fix a Leaky Faucet Handle Step by Step
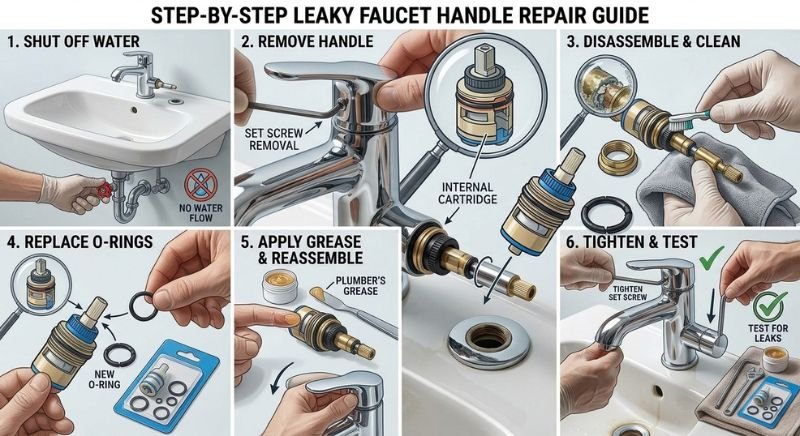
If you’ve never repaired a faucet before, don’t worry. The process is simpler than it looks. By following each step carefully, you can often stop the leak without calling a plumber.
Turn Off the Water Supply
Start by shutting off both the hot and cold water supply valves beneath the sink.
Once they’re closed:
- Turn on the faucet.
- Let any remaining water drain out.
- Place a towel inside the sink to catch small parts.
Skipping this step can leave you with an unexpected shower once the faucet comes apart.
Remove the Faucet Handle
Every faucet is slightly different, but the basic process is similar.
First, remove the decorative cap if there is one. Underneath, you’ll usually find either a Phillips screw or an Allen screw.
Carefully loosen the screw and lift the handle straight off.
If the handle feels stuck because of mineral buildup, gently wiggle it while pulling upward. Avoid forcing it, as excessive pressure can crack the handle or damage the stem.
Inspect the Cartridge, Washer & O-Ring
With the handle removed, you’ll see the internal components that control the water flow. Take a close look at each part to identify wear or damage:
- Cartridge: Check for cracks, worn seals, or visible damage.
- Washer: Inspect for flattening, tears, or uneven edges.
- O-Ring: Examine carefully, even a tiny crack can cause water to leak from the handle.
- Valve Seat: Look for corrosion or heavy mineral buildup; cleaning away these deposits now ensures a tight, reliable seal upon reassembly.
Replace the Damaged Parts
Once you’ve identified the worn component, install the matching replacement.
Be sure the new cartridge matches the original exactly. Even cartridges that look similar may not seal correctly.
Apply a thin layer of plumber’s grease to new rubber seals and O-rings before installation. This helps prevent twisting and extends their lifespan.
If you’re replacing a washer, tighten it securely without crushing the rubber.
Reassemble the Faucet
Reassemble the faucet carefully by following these steps:
- Internal Parts: Reinstall each component in the exact order it was removed.
- Handle: Slide the handle back onto the stem and tighten the screw until it is snug.
- Tension: Avoid overtightening, excessive force can damage the cartridge or make the handle difficult to turn.
- Decorative Cap: Snap the cap back into place to complete the repair.
Turn the Water Back On and Test for Leaks
Slowly reopen both shutoff valves beneath the sink.
Run the faucet through both hot and cold settings for several minutes.
Watch carefully around:
- The faucet handle
- The base
- The spout
- The supply connections beneath the sink
If everything stays dry and the faucet no longer drips, your faucet repair step by step is complete.
If water still appears, don’t panic. In many cases, another worn part was missed or the cartridge wasn’t seated correctly. We’ll cover those troubleshooting steps in the next section of this guide.
How to Fix a Single Handle Faucet That Is Leaking
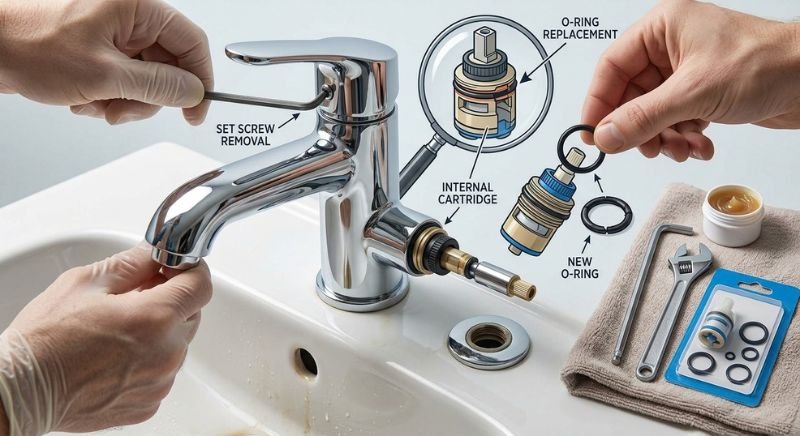
A single handle faucet leaking can be frustrating because one handle controls both the water temperature and flow. The upside is that these faucets have fewer moving parts than two-handle models, making them easier to repair.
In most cases, the leak comes from a worn cartridge, damaged O-ring, or loose retaining nut. Replacing the faulty part usually restores the faucet without replacing the entire fixture.
Single Handle Kitchen Faucet
If your single handle kitchen faucet leaking is leaving water around the handle or causing the spout to drip after it’s turned off, start by identifying where the water is coming from.
A leak around the handle usually points to a worn O-ring or cartridge seal. If water continues dripping from the spout, the cartridge is often the culprit.
To how to fix leaky faucet single handle in the kitchen:
- Turn off the water supply under the sink.
- Remove the handle using the correct screwdriver or Allen key.
- Take out the retaining clip or nut holding the cartridge.
- Remove the old cartridge and compare it with the replacement to make sure they match.
- Replace worn O-rings if they show signs of cracking or flattening.
- Apply a small amount of plumber’s grease to the rubber seals.
- Reassemble the faucet and test it for leaks.
If you’re wondering how to repair a leaky single handle kitchen faucet, replacing both the cartridge and O-rings during the same repair is often the smartest choice. These parts wear at a similar rate, and replacing them together can prevent another repair a few months later.
A dripping single handle kitchen faucet may also be caused by mineral deposits around the cartridge. Before installing the new part, clean the inside of the faucet body with a soft brush and white vinegar to remove buildup.
Single Handle Bathroom Faucet
A single handle bathroom faucet leaking usually follows the same repair process as a kitchen faucet, but bathroom fixtures often develop mineral buildup more quickly because of frequent use and hard water.
If you’re searching for how to fix a leaking single handle faucet, pay attention to where the leak appears.
- Water around the handle usually means the O-ring or cartridge seal has failed.
- Water dripping from the spout often points to a worn cartridge.
- Water collecting around the base may indicate deteriorated seals beneath the faucet body.
When performing a single handle faucet repair, clean every removable part before putting the faucet back together. Small mineral deposits can prevent new seals from sitting properly, allowing the leak to continue.
Many homeowners searching for how to fix a one handle leaky faucet replace only the cartridge and overlook the rubber seals. Spending a few extra minutes replacing those inexpensive parts can save another repair later.
How to Fix a Two Handle Faucet Handle Leak
Unlike single-handle models, two-handle faucets have separate controls for hot and cold water. That means only one side may leak while the other works perfectly.
If you’re learning how to fix a leaky faucet two handle, you’ll need to identify whether the hot handle, cold handle, or both are causing the problem.
Most leaks come from worn washers, damaged stems, or aging valve seats.
Two Handle Kitchen Faucet
A leaking kitchen faucet with two handles is commonly found in older homes.
If you’re looking for how to fix a two handle leaky faucet, begin by determining which side is leaking. Repairing only the faulty side often solves the problem.
Here’s the basic process:
- Shut off the water supply.
- Remove the leaking handle.
- Take out the stem assembly.
- Inspect the washer, stem, and valve seat.
- Replace any worn parts.
- Reassemble the faucet.
- Turn the water back on and test.
When searching how to fix a leaky kitchen faucet with two handles, many homeowners replace only the washer. While that sometimes works, inspecting the stem and valve seat at the same time can prevent future leaks.
If you own a Delta kitchen faucet repair two handle, always use replacement parts designed for that specific model. Generic parts may fit physically but fail to seal properly.
Two Handle Bathroom Faucet
Bathroom faucets with two handles usually use compression stems that wear down after years of daily use.
If you’re researching how to fix two handle leaky faucet, start by removing the leaking handle and inspecting the rubber washer at the end of the stem.
A flattened or cracked washer often explains why:
- The faucet drips overnight.
- Water continues running after the handle is tightened.
- The leak slowly gets worse over time.
If replacing the washer doesn’t stop the leak, inspect the valve seat for scratches or corrosion.
For homeowners searching how to fix a leaking faucet with two handles, replacing both washers while the faucet is already apart is a smart preventive step. If one has worn out, the other usually isn’t far behind.
The same repair applies if you’re searching for how to fix a leaky bathroom faucet with two handles. The internal components work almost the same in most bathroom sink faucets.
How to Repair a Kitchen Faucet Handle Leak
The kitchen faucet is one of the busiest fixtures in any home. It gets used for cooking, cleaning, filling pots, and washing hands throughout the day. That constant use naturally wears down the internal seals over time.
If your kitchen faucet leaking has started recently, repairing it quickly can prevent water damage inside the cabinet below your sink.
Kitchen Faucet Leaking From the Handle
A kitchen faucet leaking from handle usually means water is escaping before it reaches the spout.
This type of leak is commonly caused by:
- A worn cartridge
- A damaged O-ring
- Loose retaining hardware
- Cracked internal seals
If you’ve been asking why is my kitchen faucet leaking, don’t assume the entire faucet has failed. Most handle leaks come from inexpensive parts that are designed to be replaced.
When learning how to fix a leaky kitchen faucet, always inspect the cartridge and O-rings together. Replacing only one worn part can leave another hidden problem behind.
If your my kitchen faucet is leaking concern includes water pooling beneath the handle, dry the faucet completely before testing it again after the repair. This makes it much easier to confirm the leak is actually gone.
Kitchen Faucet Dripping After Repair
Sometimes you complete the repair, turn the water back on, and notice the faucet is still dripping.
That doesn’t always mean the repair failed.
A leaky kitchen faucet repair may continue dripping if:
- The cartridge wasn’t fully seated.
- The replacement cartridge is the wrong model.
- An O-ring twisted during installation.
- The valve seat is damaged.
- A small washer was accidentally left out during reassembly.
If you’re working on how to repair a leaking kitchen faucet, take the faucet apart again and compare each part with the manufacturer’s diagram.
Most persistent leaks come down to one overlooked component rather than a major problem.
How to Repair a Bathroom Faucet Handle Leak
Bathroom faucets are used dozens of times each day, so it’s no surprise that the internal parts eventually wear out. The good news is that most handle leaks are caused by small components that are inexpensive and easy to replace.
If you’re searching for how to fix a leaky bathroom faucet, start by finding exactly where the water is coming from. A leak around the handle often has a different cause than one coming from the base or spout.
Bathroom Faucet Leaking From the Handle
A bathroom faucet leaking from handle usually points to a worn cartridge, damaged O-ring, or loose packing nut. These parts create the seal that keeps water inside the faucet while you adjust the flow and temperature.
If water appears only when the faucet is turned on, the seals inside the handle are the first place to check. If it leaks even when the faucet is off, the cartridge is often no longer sealing properly.
Here’s how to fix a leaky bathroom faucet with a handle leak:
- Turn off the water supply beneath the sink.
- Remove the faucet handle.
- Inspect the cartridge, O-ring, and retaining nut.
- Replace any worn or damaged parts.
- Clean away mineral deposits inside the faucet body.
- Reassemble the faucet and test for leaks.
Many people searching for how to fix leaky bathroom faucet replace only the visible part that’s leaking. However, replacing both the cartridge and O-ring during the same repair usually gives longer-lasting results.
If your bathroom faucet leaking at base instead of the handle, inspect the seals underneath the faucet body. Water can travel along the faucet and make it look like the handle is leaking when the real problem is lower down.
Bathroom Sink Faucet Handle Repair
A proper bathroom sink faucet handle repair starts with identifying the exact source of the leak rather than replacing parts one by one.
If your bathroom sink faucet leaking from handle, check these components in order:
- Cartridge
- O-ring
- Washer
- Faucet stem
- Retaining nut
Inspect each part for cracks, worn rubber, corrosion, or uneven wear.
If you’re looking for how to fix a leaky bathroom sink faucet, take a picture of the faucet before disassembly. It makes reassembly much easier, especially if it’s your first DIY repair.
For a leaky bathroom faucet repair, avoid forcing parts apart with excessive pressure. Mineral buildup can make components stick, but gently twisting them while applying steady pressure is much safer than using force.
If you’re repairing a how to fix leaky bathroom faucet single handle model, always install the replacement cartridge in the correct direction. Most cartridges have alignment tabs that must fit into matching slots inside the faucet body.
A bathroom sink drip repair is considered successful when:
- The handle stays completely dry.
- The spout stops dripping after the faucet is turned off.
- The handle turns smoothly without sticking.
- Water pressure remains consistent on both hot and cold settings.
If the issue also involves weak shower flow, see the low shower water pressure guide for more detailed steps.
Faucet Handle Still Leaking? Here’s What to Check
Sometimes you replace the damaged parts, reassemble the faucet, and turn the water back on, only to find the leak is still there.
Don’t panic.
A faucet that continues leaking after a repair usually means another worn component was missed or something wasn’t reinstalled correctly.
Before taking the faucet apart again, check these common possibilities.
Water Still Leaking From the Handle
If water continues leaking around the handle, the problem is often related to the seal rather than the faucet body itself.
Here are the most common reasons:
- The new O-ring was damaged during installation.
- The cartridge isn’t fully seated.
- The retaining nut isn’t tight enough.
- Mineral deposits are preventing a proper seal.
- The replacement cartridge isn’t the correct model.
Disassemble the faucet again and inspect each part carefully. Even a small twist in an O-ring can create enough space for water to escape.
If you’re dealing with water leaking from faucet handle, avoid overtightening the retaining nut. A snug fit creates the seal, too much force can actually damage the new parts.
Faucet Still Dripping After Replacing the Parts
One of the most common frustrations is finishing a repair only to find the faucet still dripping.
If the faucet won’t stop dripping, consider these possibilities:
- The valve seat is worn or corroded.
- A rubber washer wasn’t replaced.
- The cartridge is installed backward.
- The replacement parts don’t match your faucet model.
- Dirt or debris is preventing the cartridge from sealing completely.
A faucet dripping from spout after replacing the cartridge usually points to an issue inside the valve assembly rather than the handle itself.
Before buying more parts, take the cartridge back out and compare it with the original. Even two cartridges that look nearly identical can have different dimensions or alignment tabs.
If your faucet leaks from spout only after using hot water, inspect the rubber seals again. Heat can expose a weak seal that doesn’t leak during a cold-water test.
For help identifying other household plumbing symptoms, see the home plumbing troubleshooting guide for more detailed steps.
When the Faucet Needs Replacement Instead
Most leaks can be repaired, but there are times when replacing the entire faucet is the better investment.
Consider a new faucet if:
- The faucet body is cracked.
- Internal corrosion is severe.
- Replacement parts are no longer available.
- The faucet has been repaired several times in recent years.
- Multiple leaks appear in different areas at the same time.
If your faucet is leaking at the base, the handle, and the spout all at once, replacing the fixture may save both time and money.
A new faucet can also improve water efficiency and reduce the chances of dealing with another leak anytime soon.
Common Faucet Handle Repair Mistakes to Avoid
Even a simple DIY leaking faucet repair can go wrong if a small detail is overlooked. Avoiding these common mistakes will help you complete a leaking faucet handle repair correctly the first time and prevent another leak from showing up a few days later.
Installing the Wrong Cartridge
Not all cartridges are interchangeable. Many faucet brands make cartridges that look almost identical but have different dimensions or alignment tabs. Installing the wrong one creates unexpected complications when fixing a leaky faucet. Before buying a replacement for your leaking sink faucet, compare the old cartridge with the new one or use your faucet’s model number to find the correct part.
Overtightening the Faucet Handle
It’s natural to think tighter means better when trying to fix leaking sink faucet issues, but that’s not true when repairing a faucet. Overtightening screws, retaining nuts, or the handle itself can crack plastic cartridges, damage rubber seals, strip screw threads, and leave you asking why is the faucet leaking worse than before. Tighten each part just enough to create a secure seal without forcing it.
Forgetting to Replace the O-Ring or Washer
One of the biggest DIY mistakes when fixing leaking faucet assemblies is replacing the cartridge while leaving the old rubber parts behind. An old O-ring or washer can cause a faucet leaking from base seals even if the new cartridge is installed perfectly. Since these parts are inexpensive, replacing them guarantees a lasting faucet leak fix.
How to Prevent Faucet Handle Leaks
Most faucet leaks don’t happen overnight. Understanding how to stop faucet leak issues before they start comes down to regular maintenance. The rubber seals, cartridges, and washers wear down little by little until water finally finds a way out. A few minutes of routine maintenance will keep your fixture working smoothly.
Regular Cleaning & Maintenance
Mineral deposits, soap residue, and dirt can build up inside a faucet over time. These deposits put extra stress on moving parts and prevent seals from closing tightly. To achieve a reliable faucet dripping fix and learn how to stop faucet from dripping:
- Wipe the faucet dry after cleaning to reduce mineral buildup.
- Clean the aerator every few months to maintain steady water flow; when a faucet leaks from spout aerators, sediment is usually the culprit.
- Remove hard water deposits with white vinegar instead of harsh chemicals, especially when repairing a leaky kitchen faucet.
- Check around the leaking faucet handle and base for small leaks before they become larger ones.
- Tighten loose handle screws if you notice extra movement.
- Operate the handle gently instead of forcing it open or closed.
Replace Worn Parts Before They Fail
Rubber parts naturally wear out with daily use. If you are wondering why my faucet drips, the root cause of dripping faucet trouble is usually a degraded internal seal. To fix a dripping faucet early, watch for these warning signs:
- The handle feels loose or stiff.
- The faucet makes squeaking or grinding sounds during a repair leaking kitchen faucet inspection.
- Water pressure changes unexpectedly.
- A faucet leaking from spout outlets continues to drip after turning the water off.
- You need to fix dripping faucet components due to moisture collecting around the handle.
Replacing an inexpensive O-ring or washer early is much easier than dealing with a major leaking kitchen faucet repair later.
When Should You Call a Plumber?
Knowing how to stop a leaky faucet empowers most homeowners to fix dripping sink faucet issues with basic tools. However, some problems require professional experience. Consider calling a plumber if:
- You cannot repair leaking sink faucet assemblies after replacing the cartridge, washer, and O-ring.
- You face a complex faucet leaking how to fix scenario where shutoff valves beneath the sink don’t work.
- You need to repair leaking faucet pipes inside the wall or under the cabinet.
- The faucet body is cracked or the valve seat is badly corroded.
- You can’t remove seized or heavily corroded parts.
- The leak is causing water damage around the sink.
A professional can quickly identify hidden problems, replace damaged plumbing components, and make sure the repair is completed safely.
Related Plumbing Guides
Explore these related guides for more targeted troubleshooting and practical fixes:
- Home Plumbing Troubleshooting Guide
- Why Is My Shower Water Pressure Low?
- Why Does My Sink Drain Slowly?
Conclusion
Learning the best practices for fixing a leaky faucet can save money, reduce water waste, and help your fixture last for many years. In most cases, you don’t need to replace the entire fixture. A worn cartridge, damaged O-ring, old washer, or faulty stem is usually the real cause of the problem.
By following the steps in this guide, you can diagnose the leak, replace worn parts, and restore kitchen and bathroom faucets with confidence. Whether you’re dealing with a single-handle model, a two-handle faucet, or a simple drip from the handle, taking the time to make the right repair now prevents bigger plumbing problems later. If the leak continues, don’t hesitate to contact a qualified plumber.
FAQs
How do you fix a leaky faucet handle?
Start by turning off the water supply and removing the faucet handle. Inspect the cartridge, O-ring, washer, and faucet stem for wear or damage. Replace any faulty parts, reassemble the faucet, and test it for leaks. Most handle leaks can be repaired without replacing the entire faucet.
How do you stop a leaky faucet handle from dripping?
If you’re asking how do you stop a leaky faucet handle drip, shut off the water supply, remove the handle, and inspect the sealing components. Replace worn parts, clean away mineral deposits, apply plumber’s grease to new rubber seals, and reassemble carefully.
How do I stop a dripping faucet without replacing the whole fixture?
When asking how do i stop a dripping faucet, start by replacing inexpensive internal parts such as the cartridge, washer, or O-ring. Unless the faucet body is cracked or heavily corroded, replacing the entire faucet is usually unnecessary.
Why is my faucet handle leaking?
A faucet handle usually leaks because the internal seals have worn out. Common causes include a damaged cartridge, cracked O-ring, worn washer, loose retaining nut, or mineral buildup that prevents the parts from sealing properly.
Should I replace the cartridge or the entire faucet?
If the faucet body is in good condition, replacing the cartridge is usually the better choice. It’s less expensive and often fixes the leak completely. Consider replacing the entire faucet only if the body is cracked, severely corroded, replacement parts are unavailable, or the faucet has developed multiple leaks after repeated repairs.